Knowledge from the field of Consulting Quality Assurance
The knowledge area on quality assurance gives you an overview of the topics of measurement system analysis (MSA), VDA Volume 5 (VDA 5), machine and process capability analysis (MFU/PFU), statistical process control and the ISO 17025 standard.
Here you will find answers to the following questions:
- What is the difference between a measuring and testing process and a manufacturing process?
- What quality assurance methods are used in measuring and testing processes?
- What is calibration?
- Why is a measurement system analysis (MSA) required?
- What is a proof of suitability according to VDA Volume 5?
- What is the difference between MSA procedures 1, 2 and 3?
- Which methods are used in a manufacturing process?
- Why is a machine capability study (MCS) required?
- When is a process capability study (PCS) required?
- Does an MFU of a torque wrench replace a calibration?
- What is statistical process control (SPC) needed for?
- Which standards require the qualification of measuring systems and manufacturing processes?
- When is ISO 17025 accreditation required?
What is the difference between a measuring and testing process and a manufacturing process?
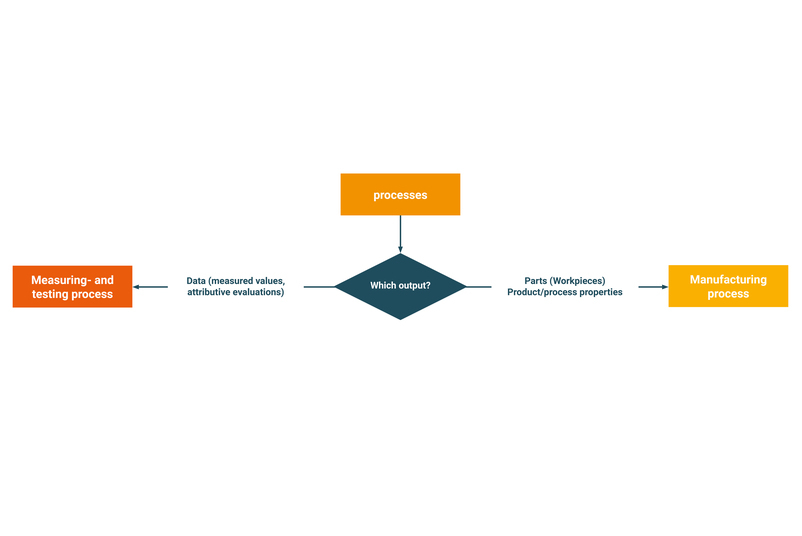
The output of a process determines whether it is a measuring and testing process or a manufacturing process. If the output is data-based, e.g. measured values or attributive evaluations, it is a measuring and testing process. If the output is a part (workpiece, product or component), it is a manufacturing process. Depending on whether it is a measuring and testing process or a manufacturing process, different quality assurance methods are used.
Which quality assurance methods are used for measuring and testing processes?
In the field of measurement and testing processes, a calibration or measurement system analysis (MSA) is used to check a measurement system.
Calibration is the basic prerequisite for ensuring the comparability of measured values in globally branched production networks. Measurement system analysis, on the other hand, is used to prove that the measurement uncertainty in processes is sufficiently low in relation to the product tolerances.
What is calibration?
The calibration of a measuring device is the determination of the deviation of a measured value between the actual and target value over a selected measuring range. You can find out more about calibration in our knowledge area:
Why is a measurement system analysis (MSA) required?
MSA stands for Measurement System Analysis and describes the analysis of a measurement process with a measuring device. Compared to a calibration, a MSA evaluates scattering components. Scatter components could be the systematic deviation (bias), the stability of the measuring system at a defined measuring point or repeatability and reproducibility.
Carrying out a measurement system analysis (MSA) is an important basis for determining the capability of a measuring device for a measurement task.
We also support you in carrying out an MSA and will be happy to advise you:
What is a certificate of suitability according to VDA Volume 5?
The suitability of measurement and testing processes in accordance with VDA Volume 5 consists of demonstrating a sufficiently low measurement uncertainty in relation to the tolerance of the characteristic to be tested. All effective contributions to the measurement uncertainty of the test process are taken into account. One way of analyzing potential contributions to measurement uncertainty is to use an Ishikawa diagram with the dimensions human, environment, measurement system, measurement object and measurement method. To determine the measurement uncertainty, repeat measurements are often carried out on the calibrated reference (type 1 study) and repeat measurements on the test object (type 2 or type 3 studies). Other methods such as the use of prior knowledge (method B) are also permissible. Methodologically, there are overlaps with measurement system analysis, MSA.
What is the difference between MSA procedures 1,2 and 3?
The measurement system analysis (MSA) according to method 1 is the repeatability measurement (n=30) of the measuring system on a reference that demonstrates metrological traceability. The repeatability of the measuring system used is determined under laboratory conditions or in a stable production environment.
The MSA according to method 2 is the repeatability and comparative measurement of the measuring system on series parts. Here, the product characteristic of series parts (n=10) is repeatedly measured (n=3) by several inspectors (n=3) using the same measuring system and in an environment close to production.
The measuring system analysis according to method 3 is a special case of method 2 and is without operator influence. Method 3 is used for automated measurement systems. This is ideal for automated test processes, e.g. in inline test stations.
What methods are used in a manufacturing process?
If we are dealing with a manufacturing process, the machine capability analysis (MFU) or the process capability analysis (PFU) is a suitable quality assurance method.
Why is a machine capability study (MFU) required?
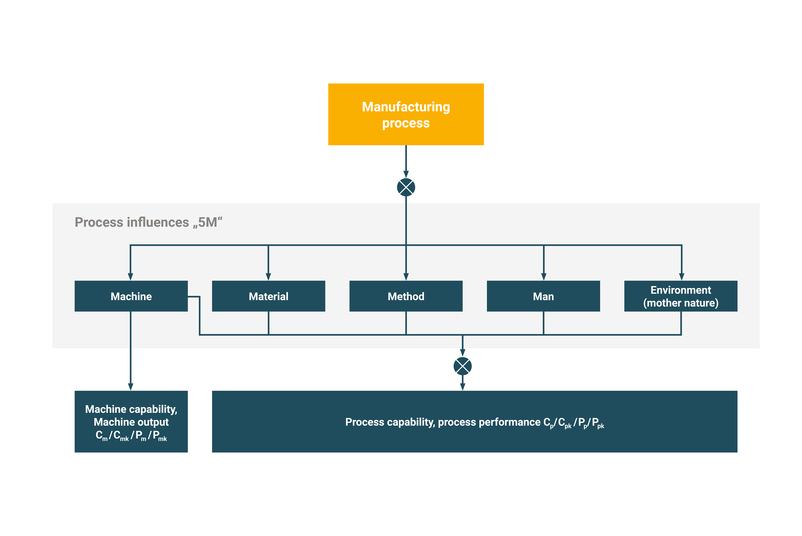
The machine capability study (MFU) is a structured test of a machine to determine whether it can reliably comply with the defined limit values of the quality-relevant characteristics in the manufacturing process. The environmental, human, material and method influences are constant or have no scattering influences. The influence of the machine is considered in a MFU and determined with the help of repeat measurements on 50-100 parts.
The machine capability is determined using the capability indices Cm/Cmk, Pm/Pmk.
With the help of an MFU, the ability of a machine to deliver results within a specified tolerance can be evaluated.
As part of statistical process control, we support you in carrying out your process evaluation to determine your machine capability: Find out more now about our consulting services to safeguard your processes:
When is a process capability study (PFU) required?
The process capability test (PFU) evaluates the capability of a process. The aim is to document whether the process can reliably comply with the defined limit values of a quality-relevant characteristic under real conditions. In contrast to MFU, PFU takes into account all influences of the process over a longer period of time. The process capability is determined using the capability indices Cp/Cpk, Pp/Ppk.
A PFU helps to improve quality and stabilize the production process.
We support you in examining your process capability as part of statistical process control. Contact us to find out more about our consulting services to safeguard your processes:
Does an MFU of a torque wrench replace a calibration?
A torque wrench provides data (torque/angle) as well as a product property (strength). In this respect, calibration, measurement system analysis (MSA) or machine capability analysis (MFU) are possible for a torque wrench.
If torque wrenches are used to check a bolted joint, an MSA or calibration is required. If the torque wrenches are used for the production of bolted joints, the MFU is the appropriate assessment.
In general, the MFU does not replace calibration.
What is statistical process control (SPC) needed for?
Statistical process control (SPC) is an essential tool for monitoring and controlling production processes. By using SPC, fluctuations in the production process can be detected and minimized, process deviations identified and process capability checked.
Find out how we can support you with our SPC consulting services for process analysis, process evaluation and process control:
Which standards require the qualification of measuring systems and production processes?
Requirements such as calibration, measurement system analysis (MSA), machine and process capability studies (MFU/PFU) and statistical process control (SPC) are required in various quality management system standards such as ISO 9001:2015, IATF 16949, EN 9100 and ISO 13485 for medical technology.
When is ISO 17025 accreditation required?
By complying with ISO 17025, laboratories can demonstrate their ability to produce valid results, which creates trust at national and international level. Accreditation ensures that the laboratory has a management system that is focused on the quality of the calibration process and is audited by national accreditation bodies.
We support you with laboratory accreditation in accordance with ISO/IEC 17025 and carry out a GAP analysis and accreditation preparation with you:

